Snowpack, React, TailwindCSS and TypeScript... What Have I done😱...and how you can do it too =)
A step-by-step tutorial on how to lose and gain ones sanity all at the same time...
Hey Bud Bud, I hope I find you well. I do hope you have had a slightly better week than the last. Even a slightly more productive one 😉. Today I would like to share with you a new and improved build process that I have been tinkering around with recently.
I made a post a while ago about getting setup with using Snowpack, React and TailwindCSS . Where I discussed using these three highly powerful developer tools to help create and build really wonderful projects.
A large part of it was just steam, learning react, using create-react-app (CRA) wasn't really cutting it for me.
To much of a thorn in the paw, for me to be really happy with it, plus it is so bloody slow and really opinionated, to the point if you want to do anything (like use Tailwind), you have to hit npm eject to escape with the goods and run away to a more habitable environment. Where you at least have a sense of what's happening, and more you have a say in it doing things.
Always remember Bears are Bosses... it comes with the territory. So when I have to use Tools like CRA I get a bit grizzly.
Plus I have really enjoyed my time with Snowpack, working with React is a doddle and with Tailwinds involved I have a brilliant developer experience, its now became my preferred toolchain.
Also It was one that I have cobbled together, and it works, which is pretty boss.
But on my learning radar was TypeScript, so given I was already familiar with my own toolchain it was time to step it up a notch. At this point I've already bet the cave on being a web developer, and the time to achieving that would be somewhat reduced if I just went and ran into the TypeScript wall head on,

So what and why would I use these tools together, and why you should give it a shot as well...
Meet the Existing Crew
In my previous post, I had both eloquently created and killed an analogy for describing the way we build sites online. The analogy still fits in my head where we are the architects for the digital constructs that we plan and design. Following on from the design and construction process we use builders in the likes of build tools, carpenters in the form of front-end frameworks and designers that complement our styles.
The builders
Its the job of the builders to bundle up our code so we can distribute it to the tinderweb. Working on any construction project having a sound relationship with your builders not only saves time, but a butt-tonne of money. The same applies to the build tools that dominate the landscape. My go-to is the ever so fast, and extremely reliable Snowpack.
Snowpack and Vite are two relatively similar build tools. They are new of the new no-frills generation of builders. They both use ESBuild under the hood, which is what I want to quickly comment on.
ESBuild is billed as an extremely fast JavaScript bundler. This really smart bundling tool written in Go, provides crazy speeds without using a cache. Does absolutely everything that a modern bundler does: "Minification, Source Maps, Tree-shaking, ES6 & CommonJS modules" bundles both for Node and the Browser... This graphic from their homepage drives home my point on ESBuild.

Absolutely crazy, 100x faster to its nearest competitor, Rollup + Terser 😮 with the older version of Webpack surprisingly quicker than the newer version 🤔.
Snowpack leverages ESBuild when it comes to bundling up the assets in your project, making the entire process quicker than most other bundlers out there. It is highly optimisable, meaning, that even straight rank amateur's like me, can modify its behaviour to suit our project needs. Which working with builders can be all the difference between a poorly built application or a strongly built one.
Carpenters
I consider React and the other frameworks like it, to be the metaphorical carpenters of the UI world. These frameworks help abstract away alot of the complexity that is involved in creating simple user interfaces. Using the power that is JavaScript they implement their own run-times, with the exception being Svelte, were they mix voodoo and JavaScript all at the same time, to produce 'Cybernetically enhanced web apps'. Regardless of how they all do it, they all produce the same effect. Epic User Interfaces.
For me React is a guild grade carpenter where as the others are still in their journeyman and apprentice stages of applying their craft. The difference for a learner like me is that working with React for longer would, like when I was working as a Joiner and working with older more skilled tradesmen, teaches you more on the job than you would pick up in the wild by yourself.
Its for this reason, I've parked my hat for now on React.
Interior Designers
What I refer to as interior designing, others would say styling. This is something that is not my forte, and I am not ashamed to admit it. To that end critters like me try and make do by working with tools that do a lot of the heavy lifting for us, to help augment our deficits and make life generally easier for us.
When It comes to styling I have perfected my palette to work easily with my way of implementing my designs.
For styling interfaces generally speaking, there is a number of ways you can tackle something like this. Using Tailwinds helps me apply straight forward classes to get the desired results quickly and effectively without having to get ugly about it.
And if you do need to get ugly, you can use Tailwinds directly inside SASS stylesheets and import these as css/sass modules into the component file. Keeping the nasty separate and away from sight.
Project Manager
In my previous analogy the developer assumes the role of the PM in the workflow. Being solely responsibly for the errors and bugs that came up in the code and dealing with them, and a myriad of other problems as they come.
Now there is often times when on a project that you would look to someone more experienced and professional who knows more about the ways things can go wrong than you do. The newly emerged position of the project manager is one that is often recruited only through necessity not volition, now the role of the PM is crucial to the overall success of any project.
This experienced management comes in the form of TypeScript.
The best way I can describe Typescript is, imagine that the Janitor from Scrubs was somehow a programming language:

If that was the case, he would most probably be the living embodiment of JavaScript.

You know that he does a job, what that is? we don't really know🤷♂️,
I mean is he a Janitor or is he a Doctor?

Now you might be thinking, ah I know where he is going with this. Dr Cox would be TypeScript, and you would be, wrong.

For many reasons, but the truth is that Dr Cox isn't as as cruel and tight-fisted as TypeScript. Where as Dr Cox has bouts of uncontrollable rage, and moments of heroic intervention. TypeScript is a far more unpleasant and unforgiving bastered. Then you must be thinking its Dr Kelso...

...wrong again...
TypeScript in this hard ass PM analogy would only be befitting of a single character, that of R. Lee Ermey's epic portrayal of Gunnery Sergeant Hartman, in Stanley Kubrick's "Full Metal Jacket" which fyi, was shot entirely in the south of England.🙄
For further clarification, the visual face of Typescript:

Having this no shits taken, drill sergeant on the project would only lead to a better coded application. From any developer's point of view, the extra errors and bugs that are caught in development means a better and more reliable application in production.

That is worth the all the intolerable abuse that is thrown at you...now its time to sign off on this recruitment decision and begin the setup...

Setup
Now that you are more than familiar with the team, or shall I say;

Two things, one I wont apologies for the gif's it is the gift that keeps on giffing, second, I wonder if I should rephrase my previous analogy to fit the characters of the A-team....perhaps, its a lot of work, i'll perhaps just call the repo it instead...
As with the last time. the vast majority of this is done via the CLI. Daunting as this sounds I will be providing screenshots and step-by-step instructions on the setup procedure, just to make it super easy 👍
Environment
A brief note on the environment I would be setting this up in. I operate a Windows 10 rig that has Windows Subsystem for Linux ($wsl ) in which I am operating Ubuntu and using the WSL VS Code extension. You can replicate this setup in both Windows and MacOS, just be cognisant of the differences between the environment's. The commands wont all be the same, but the outcome will.
Playing in the Snow
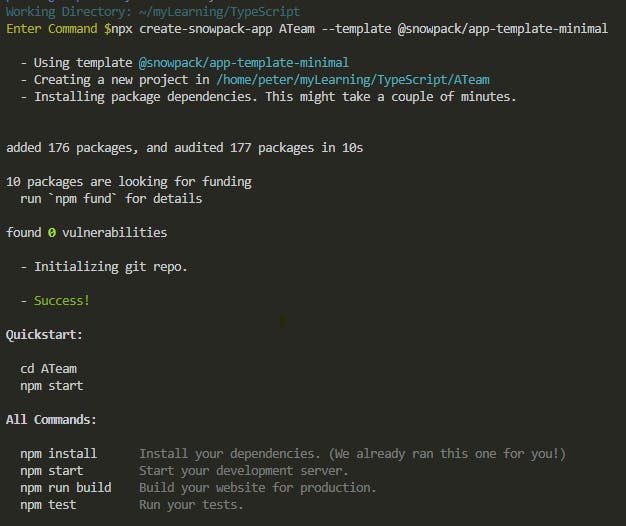
First things first, bring up the terminal.

Navigate towards your working directory and then enter:
npx create-snowpack-app ATeam --template @snowpack/app-template-minimal
This would setup snowpack, for more information on the process can be found on here
Now we cd ATeam and we take a look at the file structure. Note the file snowpack.config.js this is where we would be configuring Snowpack directly. More on that later,
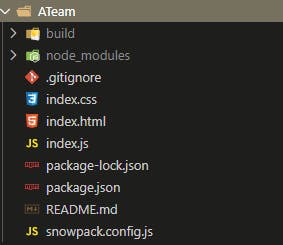
I personally have found its better to setup the project structure parallel to that of a React application.
mkdir src public
mv index.html public/index.html
mv index.css public/styles.css
mv index.js src/index.tsx
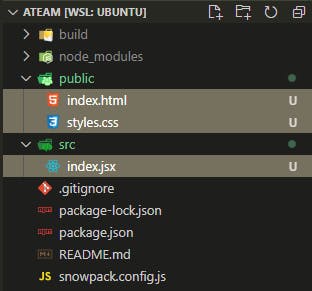 (**The file
 src/index.jsx should read assrc/index.tsx, mia culpa)
Now, in the public/index.html we need to make a few alterations.
public/index.html

-   <link rel="stylesheet" type="text/css" href="/index.css" />
+    <link rel="stylesheet" type="text/css" href="/styles.css" />

 <body>
 -     <h1>Welcome to Snowpack!</h1>
 +    <div id="root"></div>
</body>
-     <script type="module" src="/index.js"></script>
+    <script type="module" src="/dist/index.js"></script>
Now in the snowpack.config.js we are going to be setting all the many configurations at once. Bear with me if you dont understand what is going on, I will provide an explaination afterwards.
/** @type {import("snowpack").SnowpackUserConfig } */
module.exports = {
  mount: {
    /* ... */
      public: { url: '/', static: true },
      src: { url: '/dist' },
  },
  plugins: [
    /* ... */
    '@snowpack/plugin-react-refresh',
    "@snowpack/plugin-postcss",
    "@snowpack/plugin-sass",
    [
      '@snowpack/plugin-typescript',
      {
        /* Yarn PnP workaround: see https://www.npmjs.com/package/@snowpack/plugin-typescript */
        ...(process.versions.pnp ? { tsc: 'yarn pnpify tsc' } : {}),
      },
    ]
  ],
  routes: [
    /* Enable an SPA Fallback in development: */
    // {"match": "routes", "src": ".*", "dest": "/index.html"},
  ],
  optimize: {
    /* Example: Bundle your final build: */
    // "bundle": true,
    bundle: true,
    manifest:true,
    minify:true,
    sourcemap:true,
    treeshake:true,
  },
  packageOptions: {
    /* ... */
  },
  devOptions: {
    /* ... */
  },
  buildOptions: {
    /* ... */
    clean:true
  },
};
Lets break this out, Firstly we have our snowpack.mount{...} here we are instructing the builders to bundle both the ./public and ./src directory in the final build as ./ and ./dist/ respectively. Notice how we already included in this path to our <script> tag inside the public/index.html file.
Next we have an array of plugins. These plugins are what we will be adding shortly, I have included them here to save a lot of too and for'ing as we add the plugins. I have included the typescript additional options for using yarn and pnpm, personally I prefer using yarn its entirely preferential.
'@snowpack/plugin-react-refresh', allows for snowpack to provide state persistence through its Hot Module Reload which is just a brilliant feature to work with.
Both "@snowpack/plugin-postcss", & "@snowpack/plugin-sass", are plugins to work alongside our design tools.
For the Build process we are specifing to Snowpacks ESBuilder the following (self-explanatory) commands, more information about the snowpack build process can be found here. As seen in the snowpack.optimize() . In the snowpack.buildOptions() we set the clean:true this way it deletes the previous ./build directory before rebuilding a new one from development to production.
Now that is it for the most part for Snowpack, we are still a bit away from hitting npm start. Next up we are going to be setting up and configuring TypeScript
Playing with Caution
For the uninitiated, prepare for red swiggly lines and compiler errors, all in the pursuit of better, stronger, faster, more accessible code. For any support related to TypeScript you can find support in the TypeScript Handbook
Now to introduce our PM into the fold before we let the crazies in.
npm i @snowpack/plugin-typescript typescript typed-scss-modules @types/snowpack-env @types/react @types/react-dom --save-dev
This command setups the TypeScript-Snowpack plugin along with the typescript compiler, now with other builders you have to specify the TS compiler tsc to watch for changes to files. Snowpack integrates the TS compiler into its build process, saving a very neurotic step from one's workflow.
We then install a typed-scss-modules plugin into TS which would let us work with *.module.{css,scss,sass} files. More on this later.
We then install a list of Type Dependencies into the project for the benefit of TypeScript, where it reads the types for the additional dependencies that we are using, in this case React and Snowpack.

Now once this is all installed, we setup the TypeScript config file, this tsconfig.json file is saved in the root of your project, it can be created from the CLI by entering:
npx tsc --init

Inspecting the newly created file, we see a tonne of compiler options,
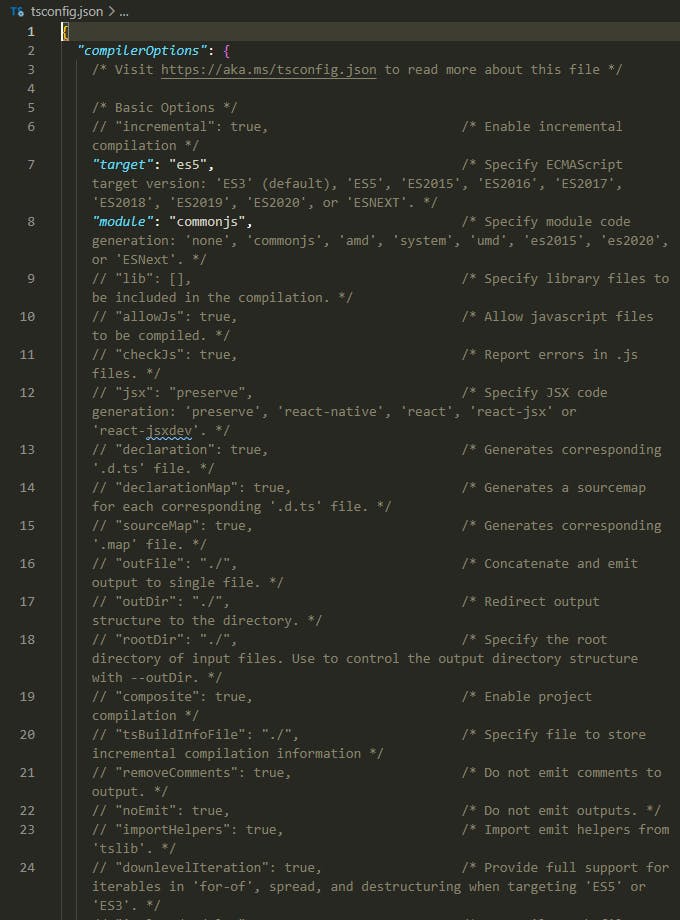 For more information on what you are staring at, you can file out a lot more from the Docs on TSConfig.
For our application this is the following settings for our tsconfig.json
{
  "include": ["src","src/**/*.tsx", "types"],
  "exclude": ["node_modules"],
  "compilerOptions": {
    "lib": [
      "ES2015",
      "DOM",
    ],
    "module": "esnext",
    "target": "es5",
    "moduleResolution": "node",
    "jsx": "preserve",
    "baseUrl": "./",
    "plugins": [{ "name": "typed-scss-modules" }],
    /* paths - import rewriting/resolving */
    "paths": {
      // If you configured any Snowpack aliases, add them here.
      // Add this line to get types for streaming imports (packageOptions.source="remote"):
      //     "*": [".snowpack/types/*"]
      "src/*":["../"]
      // More info: https://www.snowpack.dev/guides/streaming-imports
    },
    /* noEmit - Snowpack builds (emits) files, not tsc. */
    "noEmit": true,
    /* Additional Options */
    "strict": true,
    "skipLibCheck": true,
    "types": ["react","react-dom","snowpack-env"],
    "forceConsistentCasingInFileNames": true,
    "resolveJsonModule": true,
    "allowSyntheticDefaultImports": true,
    "importsNotUsedAsValues": "error"
  },
}
I must make a slight confession at this stage, there is a starter snowpack-typescript installation template that one can use instead of the minimal one we used earlier. This can be found at @snowpack/app-template-blank-typescript, now this would skip this part of the setup in its entirety, but where would be the fun in that... 🙄
Lets Get Reactive
Believe it or not, it's really straight forward getting react up and running in this build. Snowpack does a lot to enhance the developer experience when working with front-end frameworks. for React we get a lot of extra features that help just make things better overall. I wont list them, you are just going to have to set this up and experience them yourself,
To setup React, we enter:
npm i react react-dom @snowpack/plugin-react-refresh --save-dev
Personally I prefer to save React to the dev dependencies list. Given the way Tree-shaking gets applied anything that has an import statement gets pulled into the final build. You can elect to --save to the dependencies list instead, it is entirely your choice.
Now inside our src/index.tsx file we apply the following:
import React from "react"
import ReactDOM from "react-dom"

ReactDOM.render(
    <React.StrictMode>
        <h1> I love it when a plan comes together</h1>
    </React.StrictMode>,
    document.getElementById("root")
)
// Hot Module Replacement (HMR) - Remove this snippet to remove HMR.
// Learn more: https://www.snowpack.dev/concepts/hot-module-replacement
//@ts-ignore
if (import.meta.hot) {
    //@ts-ignore
    import.meta.hot.accept()
}
Now from this point you are able to build your React Components with TypeScript, fortunately for both of us, I would not be doing a demo on this here..."for it would be out with the scope of this article" 😅(god what a brilliant cop out)
Time for the Designers
Now the designers that I have enlisted on to this project is:
The idea with working with the three arguably the most powerful design tools that is available for developers, means that you need to make compromises, is further from the truth. I have found by working with Sass I can still harness the power of the pre-processing library that would let me run loops and a nested styling structures. It still allows me to utilise the BEM naming convention when it comes to labelling classes. I can import the sass file as Module's into the .tsx file directly and be able to call the type definitions of each class that we set in the stylesheet.
Coupled with the Tailwinds, I can apply inline CSS styles, component-specific-stylesheets, or even use CSS directly inline in JS. I am truly not limited instead I feel more empowered to make and apply complex styling rules to components.
To setup the Designers on the project we enter:
npm i @snowpack/plugin-postcss@latest postcss@latest postcss-cli@latest autoprefixer@latest tailwindcss@latest @snowpack/plugin-sass --save-dev
First off, we need to install a third-party plugin called PostCSS to work as a post-css compiler to transpile the Tailwinds CSS into the project. PostCSS requires its own postcss.config.js file in the root, this simple file would inform that we want to run tailwinds and autoprefixer to our styles at runtime.
touch postcss.config.js
postcss.config.js
module.exports = {
    plugins: [
        require('tailwindcss'),
        require('autoprefixer')
      ],
  };
Now PostCSS is not a SASS pre-processer for that we installed the@snowpack/plugin-sass -which we have already informed the Snowpack config file of our intentions.
To setup a TailwindCSS config file, and where we turn on Tailwinds latest party trick...
npx tailwindcss --init

Inside our tailwind.config.js we apply the following settings:
module.exports = {
  mode:'jit',
  purge: [
    './src/**/*.{css,module.css,js,jsx,ts,tsx}',
    './public/index.html'
  ],
  darkMode: false, // or 'media' or 'class'
  theme: {
    screens:{
      'sm': {'min': '0px', 'max': '425px'},
      'md': {'min': '426px', 'max': '768px'},
      'lg': {'min': '768px', 'max': '1279px'},
      'xl': {'min': '1280px', 'max': '1535px'},
      '2xl': {'min': '1536px'},
    },
    extend: {
  },
  variants: {
    extend: {},
  },
  plugins: [],
}
Now to quickly explain what's going on here. TailwindCSS originally had the problem of having all of its utility CSS's being included from the start, it was only until build time that you would get any tree-shaking, as defined by the tailwind.purge().
The very good dev's over at Tailwind recognised this as a core problem of their application as it would often lead to a 3.5Mb CSS file that would seriously bloat and hamper the devX that it aimed to be.
With the incorporation of their own 'Just-in-Time' compiler we can now have extremely small stylesheets as we develop our styles by using Tailwinds utility library. This is turned on by writing tailwind.mode('jit'). I have also amended some of the breakpoints to best suit my own workflow.
We then make a Tailwind.css file in our ./src directory and apply the following three lines to it:
@tailwind base;
@tailwind components;
@tailwind utilities;
This is it for the setup for the Designers, we are now ready to apply styling in the most powerful ways a bear can.
Now a typical component file would be something that looks like this:
component.jsx
import React from 'react'
import styles from './component.module.scss'

const elWrapper = styles.elementWapper
.elementWrapper{
   @apply flex flex-row;
   &::before{
       ...
   }
}
Last but not least we have to write a few npm scripts to allow each of our team members to work synchronously with each other.
package.json
The npm package.json after all of this should look something like this:
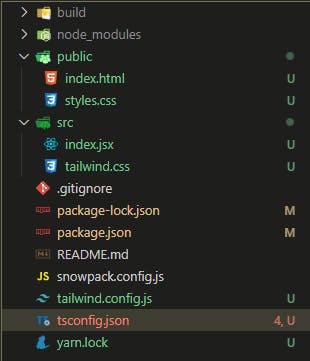
I have found that you cannot 'stream' each team member together, instead we have three separate npm script commands to start each of them individually.
 "scripts": {
    "start": "snowpack dev",
+  "sass": "tsm src -w",
+  "tailwinds": "postcss src/tailwind.css -o public/styles.css -w",
+  "prebuild:tailwind": "tailwindcss build src/tailwind.css -o public/styles.css",
    "build": "snowpack build",
    "test": "echo \"This template does not include a test runner by default.\" && exit 1"
  },
Now in order to spin up our Snowpack Development Server, we would enter
npm run start
To watch and monitor our Sass pre-processer along with TypeScript,
npm run sass
where it generates special *.module.scss.d.ts files, these are TypeScript type files, that informs the TypeScript compiler of the type settings for the stylesheets.
To monitor and live compile Tailwinds using tis super awesome JIT compiler, we enter:
npm run tailwinds
It is advisable to setup multiple instances of your terminal, so that each window operates one specific npm command, please note that if you ever need to restart the server or cancel a command you can do so by Ctrl+C, when you do you would need to restart both the tailwind and sass watcher scripts aswell.
It should look something similar to this:
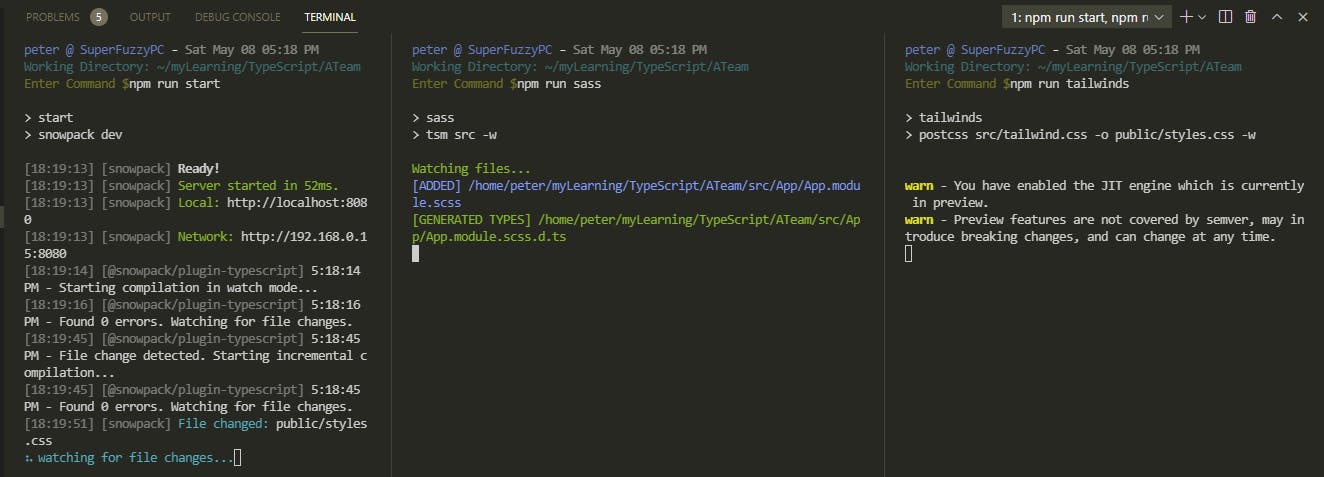
Now Build Away
That is it pretty much, for setup and integrating everything. I will always stand by the statement that having solid foundations is what you build upon. There are other build tools and combinations of tool-chains that you can adopt that best works for you, I would highly advise that you take the time to explore the options that are out there and like when it comes to picking out shoes, find the best one that fits.
For me, I am assured in the knowledge that if I wished to I can easy modify this setup to work with other frameworks, such as Vue or Svetle, indeed I can even setup my own SSR and work with NextJS and Express, all without having to change much to the overall setup of my tool-chain.
Now when you have finally created and ready to deploy your application all you need to do is enter
npm run build
This would first precompile all the TailwindCSS that we have put into the application after which we then let snowpack use its tools to then put together a ./build folder. This is the folder that we then place on the production server to be hosted to the entire Forrest for all the critters to see.
I do hope you enjoyed this article, and I do hope you keep being awesome.
Take care Bud
